The September window is the most valuable preventive opportunity for Macon homeowners who want to reduce their rodent risk before winter. It's after the hottest crawl space temperatures that make exclusion work more difficult in July and August, and it's before the October and November cold-snap surge that drives roof rats deeper into attic spaces and Norway rats out of Ocmulgee corridor burrows. A home that's exclusion-sealed in September enters fall with a protected envelope rather than an open invitation.
Why timing matters in Macon
Most rodent-proofing guides are agnostic about timing. In Macon's subtropical climate, timing matters more than in cooler regions because the seasonal pressure spikes are predictable. October cold snaps drive roof rats in Vineville, Ingleside, and Shirley Hills to settle deeper into warmed attics, any roofline gap that was used infrequently in summer becomes a high-traffic entry point overnight when the first sustained cool nights arrive. Ocmulgee corridor Norway rats begin pressing into East Macon and Fort Hill foundations more aggressively as fall rains raise river levels. September exclusion sealing, before both of these events, is the most cost-effective intervention timing in Macon's annual rodent cycle.
The material choices that matter in Macon's climate
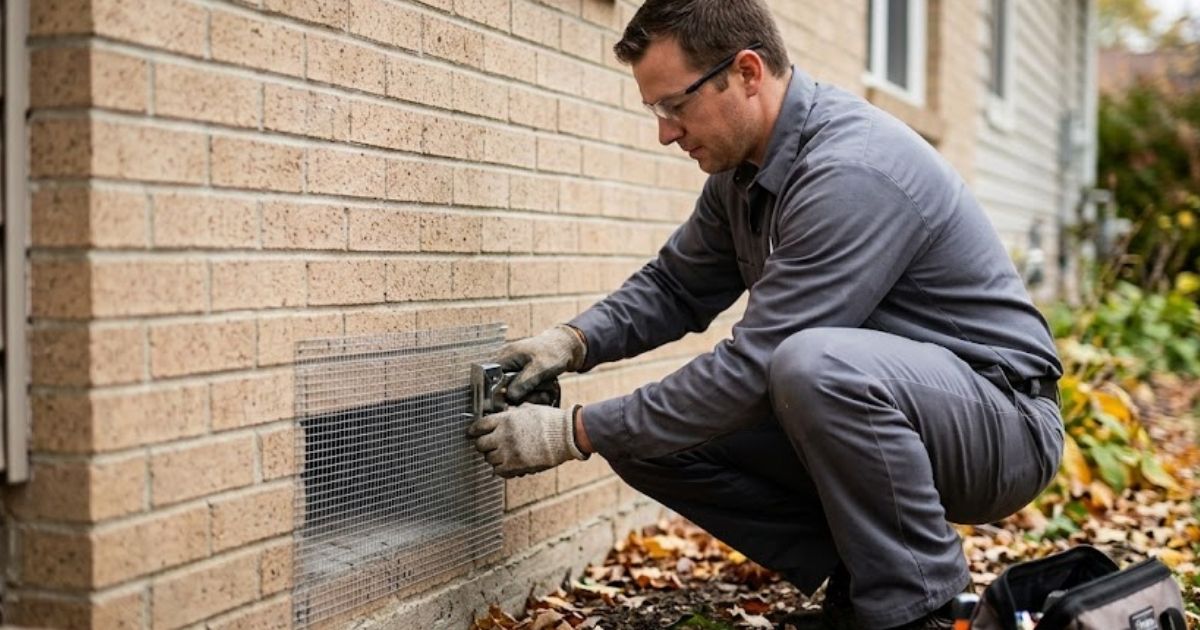
Standard rodent-proofing advice often recommends steel wool and expanding foam. Both fail quickly in Macon's conditions. Steel wool corrodes within 6 to 12 months in Macon's high humidity, losing its integrity as a gap filler. Expanding foam sealant applied to concrete foundation surfaces compresses and cracks within one wet season under the stress of Macon's clay soil movement. The materials that hold in Bibb County's climate: copper mesh (non-corrosive, rodents can't chew through it) for pipe gaps and small penetrations, 19-gauge galvanized hardware cloth mechanically fastened to vent frames for foundation vents and soffit returns, and exterior-grade polyurethane or silicone sealant rated for subtropical humidity as the finishing layer over copper mesh backer. These materials cost more than foam and steel wool, and they last 4 to 8 years rather than 6 to 18 months.
The zone sequence, start where the pressure is highest
For Vineville, Ingleside, Shirley Hills, and Bloomfield homeowners, the roofline zone is the priority: ridge vent gaps, soffit returns, gable vents on both faces, dormer flashing, and canopy trimming to clear branches within 3 to 4 feet of the roofline. These are the roof rat entry points that will be most heavily probed in October and November. For East Macon, Fort Hill, and North Highlands homeowners, the foundation zone is the priority: foundation vent re-screening, mudsill gap sealing (requires crawl space entry), and utility pipe penetration closing. These are the Norway rat and mouse entry points that will face the highest pressure in fall and winter. For most Macon homes, both zones need attention, but the highest-pressure zone for your specific neighborhood and building era should come first if you're working on a limited budget or timeline.
What you can do yourself, and where pro inspection adds value
A motivated homeowner can address the most accessible and visible entry points: dryer vent gap sealing with a dedicated dryer vent cover, gas pipe penetration closing with copper mesh and exterior sealant at the wall face, and replacing a clearly damaged foundation vent screen with hardware cloth. These are the gaps that are accessible from grade level without specialized equipment. What pro inspection adds is the zones you can't check yourself: the mudsill gap (requires crawl space entry), the ridge vent condition (requires attic interior access), and the soffit-to-rafter gap at eave level (requires ladder access at the roofline). A pro inspection that documents every gap with its location and recommended seal material, even if you do the sealing work yourself, is a worthwhile investment before winter in Macon.
The pre-October walkthrough checklist
Some Macon homeowners want to do rodent-proofing themselves before the fall surge. Here's a practical sequence for a September walkthrough. Start at the foundation perimeter on the outside. Walk slowly around the entire foundation. Check each foundation vent screen. Look for burrow holes in the soil within two feet of the foundation. Inspect any pipe or utility entry points at ground level. Examine the garage door threshold. Note everything that needs attention. Move to the upper exterior, inspect the soffit line from the ground (binoculars help), looking for separations at the soffit-to-wall trim, gaps at gable vents, condition of the ridge if visible, and any tree branches within four feet of the roofline. Move into the attic, bring a strong flashlight and look at the underside of the roof deck for any visible daylight (which shows roofline gaps), inspect the gable vent screens from the interior, check the access hatch frame, and look for any existing droppings or grease marks. Finally, enter the crawl space if accessible, inspect the mudsill joint along the entire foundation perimeter, check each foundation vent screen from inside, examine all utility penetrations on the interior face of the foundation, and look for burrow soil disturbance.
This walkthrough produces your personal inventory of what needs to be addressed. The honest check from doing this on your own home: most homeowners find more issues than they expected, especially in the crawl space and attic interior. The walkthrough itself doesn't require pro skills, it requires attention, time, and a willingness to access the crawl space and attic spaces that homeowners usually don't enter. If the walkthrough exceeds what you can reasonably address yourself, that's the signal that pro inspection and exclusion work is right.
Tool list for serious DIY work
For homeowners who plan to do their own exclusion work, the basic tool inventory matters: a roll of 19-gauge galvanized 1/4-inch hardware cloth (not 1/2-inch, mice pass through 1/2-inch openings), copper mesh (sold in pest control supply stores or online), a tube of paintable exterior-grade polyurethane sealant, stainless steel staples (not standard galvanized, galvanized rusts in Macon humidity within two seasons), tin snips for cutting hardware cloth, a putty knife and flexible spatula for working sealant into gaps, work gloves for handling cut hardware cloth (the edges are sharp), and a strong LED flashlight or headlamp for inspection. Avoid steel wool, it rusts and provides no long-term seal in Macon's humidity. Avoid expanding foam alone, it cracks and pulls away from concrete within a season. The materials list isn't expensive (usually under $100 for everything), but having the right materials matters because the wrong materials produce work that fails within months.
When to call rather than DIY
Some rodent-proofing tasks are right for homeowner DIY. Others aren't. Right for DIY: dryer vent gap sealing. Gas pipe wall penetration closing at grade level. Garage door threshold replacement. Basic foundation vent re-screening from the outside. Weatherstripping replacement at exterior doors. Not right for DIY: crawl space mudsill sealing (requires entering the crawl space and working overhead in tight spaces with proper PPE), attic interior exclusion at the ridge or upper soffit (requires safe attic mobility and ability to work at uncomfortable angles), any work requiring ladder access at roofline height (the safety risk for a homeowner doing infrequent ladder work outweighs the cost savings), and any exclusion work where the underlying check hasn't been thoroughly done (sealing in unknown patterns produces incomplete results that frustrate the homeowner). The decision point is honestly: do you have the skills, equipment, and time to do the work safely and correctly, or are you trying to save money on something that actually requires pro execution? Macon Rodent Control inspections are free, so getting a pro check of what's needed before deciding what to DIY costs nothing and prevents wasted effort on the wrong work.
The post-work verification step
One step that DIY exclusion work often skips: verifying that the work actually closed access. After you've completed an exclusion seal, say, packed copper mesh into a pipe penetration and finished with sealant, verify it from both sides if possible. From the exterior, the seal should appear continuous and have no visible gaps. From the interior of the wall cavity (if accessible), the seal should be visible from the inside without any obvious gap behind it. For seals you can't directly verify from both sides, monitor the area for activity for several weeks afterward, if you notice continued evidence in the surrounding area despite the seal, the seal may have an issue you didn't detect at work. Re-inspection two to four weeks after exclusion work is a step that professionals do automatically and that homeowners often skip; building it into your own DIY process improves results much.
Want a professional pre-winter inspection before the cold drives activity indoors? Reach us at (844) 635-0403 — we walk all five zones, document every entry point, and leave you with a written report.